This post describes how to install 12d Model.
You are in the right place if:
- You have just purchased 12d Model and you want to install the program
- You have 12d Model and you want to install it onto a new computer
- You have 12d Model installed and you want to upgrade to the latest release
If you already have 12d Model installed on your computer, and you need to install a new authorisation file, instructions are on this page.
Installing 12d Model 15 has three steps
- Download & Install 12d Model 15.
- Attach the USB dongle
- Authorise 12d Model
The first two steps are described in more detail below.
The final step (Authorise 12d Model) is described on this page.
Download 12d Model 15 here
If you need to install an earlier version of 12d Model, head to the 12d Solution website https://www.12d.com/multimedia/12d_Model_Past_Versions.html
12d Solutions put the link for the installer inside the installation instructions.
Download the pdf and open it. The link to the installer will be found on page 7.
If you already have 12d Model installed on your computer, and you want to upgrade to the latest release simply complete Step 1
12d Solutions releases a new Version of 12d Model roughly every two – three years.
During the life of a Version there will be numerous minor Releases.
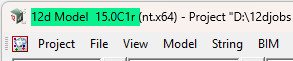
Each minor Release is identified by a ‘C’ number, and this number is displayed in the top left corner of the 12d Model window.
The version shown below is 12d Model 15 C1r.
The ‘r’ indicates that it is the 18th Release of 12d Model 15 (ie there have been C1a, C1b, C1c, C1d etc)
You can check that you have the latest Release by opening 12d Model and choosing Help=>Check for Updates
1. Download and Install 12d Model
12d Model can be downloaded from the 12d Solutions website, or from the 12d User Forum or from the links at the top of this page.
The version on the User Forum is usually later (newer and better) than the version on the 12d Solutions website.
The link the top of this page will give you the same version as the Forum
You will need to log on to the Forum to access the download.
If you go to the 12d Solutions website, look for ‘Product Updates’, and you will find the download links inside the installation instructions.Once the installer has been downloaded, simply double click on the file to install 12d Model
Note that if you already have 12d Model installed, you will be asked if you want to un-install the existing version. The correct answer is ‘Yes‘
You will then be warned: ‘Proceeding with the uninstaller will delete all files from your installation directory’. You should press ‘Yes‘ to continue.
The installer writes files to the ‘Program Files’ area of your computer. None of your projects or configuration are stored in this area, so your work will not be affected by the installation.
2. Attach the Dongle
O.K. so this is a bit obvious.
The important thing to remember is to attach the dongle to the computer AFTER you have installed the 12d Model
3. Install the Authorisation File
Instructions for installing the Authorisation Files are given on this page
After completing these steps, you should be able to start 12d Model Software using the desktop icon.
If 12d Model does not start an “Authorization Error” panel will be displayed.
For information about the errors and how to solve these, please refer to Wiki page “Error starting 12d Model”
Certifying Codemeter Dongles
Codemeter dongles have a security feature that requires them to be Certified over the internet every 60 days.
This will happen automatically if your computer is connected to the internet, and you will not even know that it has happened.
You can manually certify the dongle from inside 12d Model using Project=>Management=>Dongles=>Certify codemeter.
If you have difficulty Certifying the dongle, refer to this page.