[vc_row][vc_column][vc_column_text css=””]
BIM => Visualisation => Timelines => Play => Play[/vc_column_text][/vc_column][/vc_row][vc_row][vc_column][vc_separator border_width=”5″][/vc_column][/vc_row][vc_row][vc_column][vc_single_image image=”11830″ img_size=”full” css=””][/vc_column][/vc_row][vc_row][vc_column][vc_column_text css=””]
Timeline
Timeline
- Select the timeline file to play/record.
Start time
- Time (in seconds) to start playback.
Time multiplier (optional)
- Increase/Decrease speed of the timeline playback.
- Setting this to 2 would run the timeline at 2x, meaning a 60 second timeline will be a 30 second video.
Auto play
- Whether or not to start playing the timeline immediately after hitting Run.
- It is recommended to un-tick this option.
[/vc_column_text][/vc_column][/vc_row][vc_row][vc_column][vc_separator border_width=”5″][/vc_column][/vc_row][vc_row][vc_column][vc_single_image image=”11831″ img_size=”full” css=””][/vc_column][/vc_row][vc_row][vc_column][vc_column_text css=””]
Movie
Create movie?
- Tick on to record a movie (*.avi file) of the selected timeline.
Video encoding format
- Microsoft Codec
- NVidia Cuda – ONLY appears when a suitable NVidia GPU and Cuda 10.1 (or later) Drivers are installed.
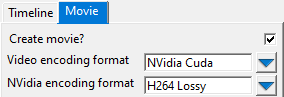
NVidia encoding format
- Only becomes active AFTER selecting NVidia Cuda.
Movie file
- Enter a file name. Hitting enter automatically adds the “avi” extension.
Record whole application
- If ticked, the View option is disabled and the entire 12d Model window will be recorded. This may be useful for recording playback in multiple views.
View
- Select the view to be recorded.
- Warning: Do not open/move other windows in front of the recorded view, as these will appear in the movie.
Frames per second
- Number of frames (images) displayed per second.
- Increasing the frame rate creates a smoother movie, but increases file size.
- As a guide, most TV broadcasts and Movies are at 25-30FPS. Modern PC games are at 60FPS and higher (depending on hardware).
[/vc_column_text][/vc_column][/vc_row][vc_row][vc_column][vc_separator border_width=”5″][/vc_column][/vc_row][vc_row][vc_column][vc_column_text css=””]
Buttons
Run
- Run/Record the timeline. Hitting Run will automatically close the panel and open the Timeline Player and Video Compression panel.
Finish
- Close the Play a timeline panel.
[/vc_column_text][/vc_column][/vc_row][vc_row][vc_column][vc_single_image image=”11845″ img_size=”full” css=””][/vc_column][/vc_row][vc_row][vc_column][vc_separator border_width=”3″][/vc_column][/vc_row][vc_row][vc_column][vc_single_image image=”11846″ img_size=”full” css=””][/vc_column][/vc_row][vc_row][vc_column][vc_column_text css=””]
Video Compressor
- Select a compressor format, and hit Ok.
- It is suggested to use Microsoft Video 1
- Note: Use Full Frames (Uncompressed) with caution. Some operating systems and/or software have restrictions on the AVI file size.
[/vc_column_text][/vc_column][/vc_row][vc_row][vc_column][vc_separator border_width=”5″][/vc_column][/vc_row][vc_row][vc_column][vc_column_text css=””]
NVidia Cuda Encoding
When using the NVidia GPU, you may receive the following error message in the Output Window;
! View width must be in multiples of 64 pixels
Go to the View Settings menu, and select Properties;
[/vc_column_text][/vc_column][/vc_row][vc_row][vc_column][vc_single_image image=”11834″ img_size=”full” css=””][/vc_column][/vc_row][vc_row][vc_column][vc_column_text css=””]In the left-hand tree, select Viewsize. Then change the Top, Left, Bot, Right values so that the Draw Area Width & Height values are multiples of 64.[/vc_column_text][/vc_column][/vc_row][vc_row][vc_column][vc_single_image image=”11835″ img_size=”full” css=””][/vc_column][/vc_row][vc_row][vc_column][vc_separator border_width=”5″][/vc_column][/vc_row]